
Super Suite
Get all extensions for one suite price
Design Extender
Design and create unlimited websites
Data Bridge
Develop database-driven websites
eCart
Build a responsive shopping cart + checkout
MySQLi Server Behaviors
Generate streamlined MySQLi
Free PayPal Toolkit
Paypal, PayPal Credit, and Skype
Help
Tutorial created by Jason Byrnes, WebAssist
Categories: Data Bridge, Design Extender, eCart, MySQL, PHP
From defining a Dreamweaver site to creating a basic master / detail page set, we will examine the basic building blocks of dynamic website development and how to use a MySQL database.
Before you get started developing a dynamic site or using a database, there are a few things you will need to get ready:
- You will need a server for testing - this can be a local web server that you set up on your computer, or it can be a remote web server.
- On whichever server you use, you will need to create a database, and populate it with tables to hold data.
- You will need to configure a site in Dreamweaver to connect to the server.
- In the Dreamweaver site, you will need to create a connection to the database.
We will look into these aspects of using Dreamweaver for creating data driven sites in the sections to follow
When it comes to developing a dynamic site, you will need a web server to test with. You can use one of the popular Apache / PHP / MySQL packages that you install on your computer like XAMPP or MAMP. Or you can use a site that is created through a web hosting company like 1&1, or DreamHost.
Most people tend to use a local testing server in the beginning.
If you wish to install a local testing server, you can download the XAMPP package for Windows or Macintosh from the apachefriends site here:
http://www.apachefriends.org/en/xampp.html
Another Macintosh option is to use MAMP:
http://www.mamp.info/en/index.html
or for Windows users, there is the WAMP package:
http://www.wampserver.com/en/
Each of these sites will offer download and installation instructions to get you going. they also have support forums to help you if the install is not going smoothly.
There is a tutorial here for installing MAMP on Mac OS:
And one here for installing XAMPP on Windows:
After installing one of these local testing servers, a folder will be created that is the Site Root. This is the folder that will be used when you point your web browser to the http://localhost address. It is important to become familiar with this folder before moving forward. We will need to know this folder before creating the Dreamweaver Site definition.
In the steps of this tutorial I will be using the MAMP server and MAC OS.
Once a testing server is set up, either locally or using a remote hosting service, you will need to define a site for Dynamic Development in Dreamweaver
In this section we will set up a Dreamweaver site to use for following this tutorial, there is also another tutorial for defining a site here that contains more details.
In Dreamweaver go to Site -> New Site.
you can edit an existing site definition by going to Site -> Manage Sites. Select the site you wish to modify, then click the edit button.
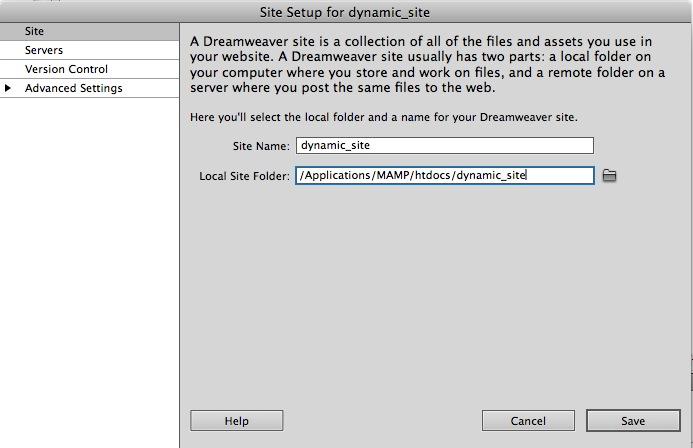
In the first section of the site definition, you will set the Local Information. This sets the Site Name, and local path for files in your site.
If you are using a local testing server, It is recommended to set the local path to be a folder inside the site root folder. For example: I have MAMP installed on my Macintosh computer. In MAMP, the site root folder is:
/Applications/MAMP/htdocs
when creating a new site in Dreamweaver, I like to create a subfolder of htdocs:
/Applications/MAMP/htdocs/dynamic_site
and use that as the local path
When using XAMPP in a windows system, it may be that the site root is mapped to:
C:\xampp\htdocs
so the new site folder would be created under that location:
C:\xampp\htdocs\dynamic_site
It's important to become familiar with the testing server package you have chosen and where the site root is.
In the case where you do not install a local testing server and you opt to use a remote hosted site for testing, the local path setting is not that important, just make sure the path is web safe (in other words, use only alpha numeric characters in any folder names).
In this screen shot, i am using DW CS5.5 on a Macintosh system with MAMP installed:
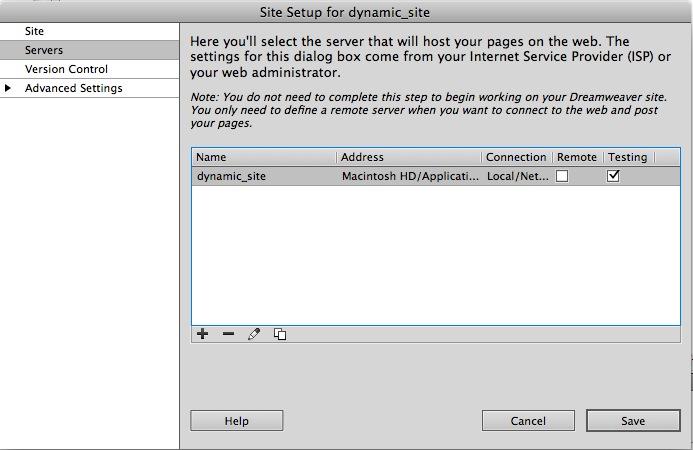
The next setting is to connect to servers. In DW CS 4 and above, this done by selecting the servers section:
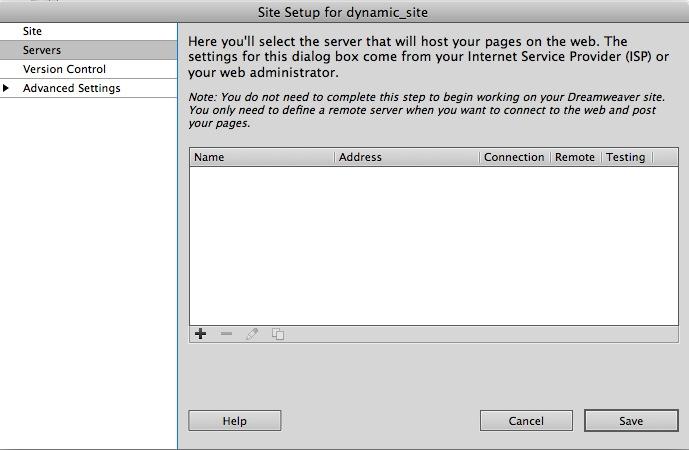
and clicking the plus icon to define a new server connection.
For the Name you can enter the same name as the Site definition, When using a local testing server, set Connect Using to "Local/Network"
Set the Server Folder to the same location as the local files set in the initial Site Settings.
The Web URL will be:
http://localhost/dynamic_site
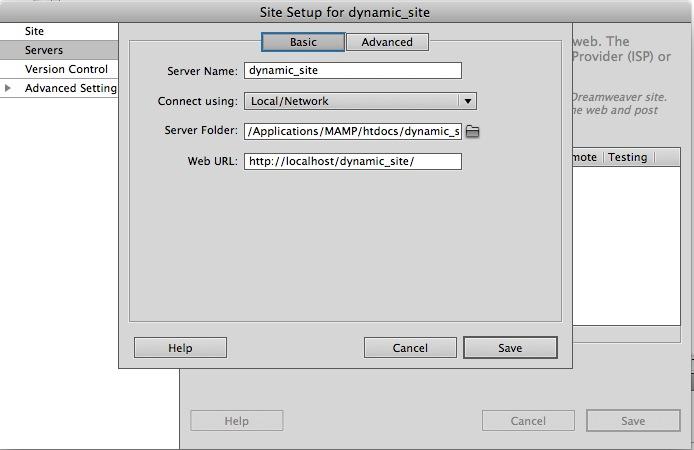
Click the advanced button and set the Application model to PHP / MySQL
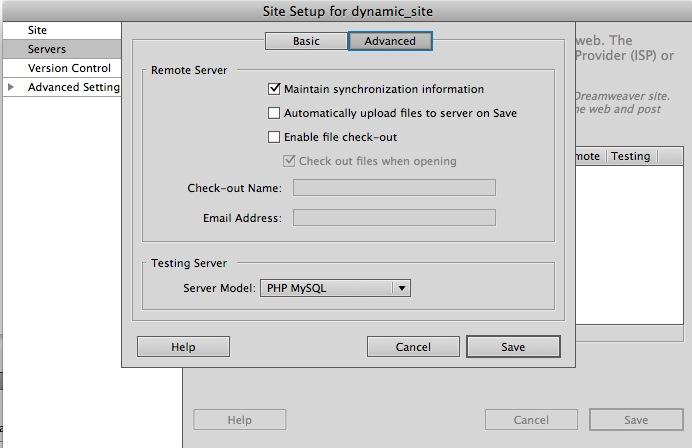
once the connection is defined, there are check boxes to set the connection as a testing or remote connection, check the testing option.
once the site has been defined, add the images folder in the linked attachment to the site root, these are image files for the items in the blue sky music catalog we will be using
images.zip
A database is used to store information for your site. It can be used for a products catalog, or for a users registration for just a couple of examples.
In this section, we'll look into how to create a database. The Most common tool for managing and creating a database is phpMyAdmin. It is available through Most web hosts, and most local testing server packages.
Most web hosts use a control panel for managing your site, in the control panel they will have a way to create a MySQL Database. For example, using 1 & 1 as a host, I can log into my account, and under the Web Space section there is a link to the MySQL Administration section. On this page, I can select the option to create a new database. Once a database has been created, you can use phpMyAdmin to edit it.
phpMyAdmin is also available using most Local Testing server packages like XAMPP or MAMP. The Start pages for those server will have a link to open phpMyAdmin.
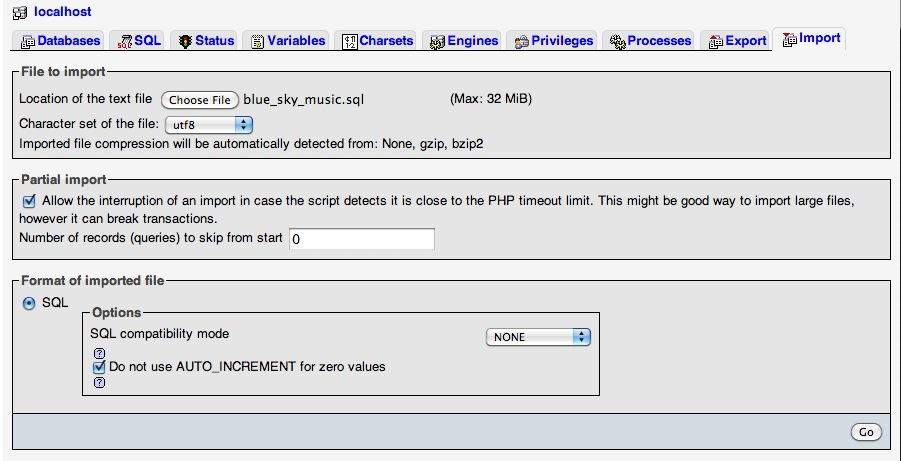
In phpMyAdmin, go to the Import tab. Use this .sql script to create the blue sky music database that we will be using in this tutorial:
blue_sky_music.sql
On the import tab, Click the chose file button, and select the blue_sky_music.sql file that you downloaded, and click the go button to have the database created:
Now that a site and a database are created, lets connect the 2 together.
There is a another tutorial here that deals with creating a database connection for more details.
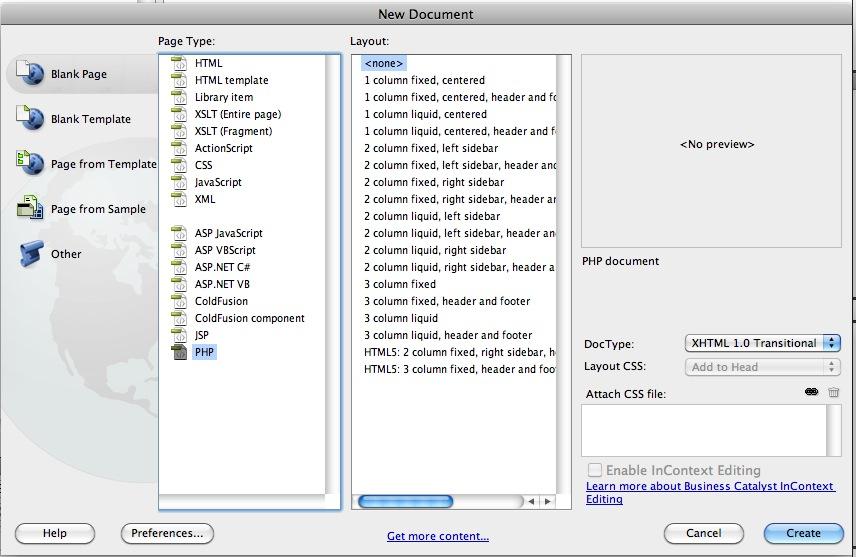
Before creating the database connection, a new PHP file needs to be created and saved to the site
Go to File -> New. In the File Creation dialog, select Blank Page. From the page type section, select PHP and click the create.
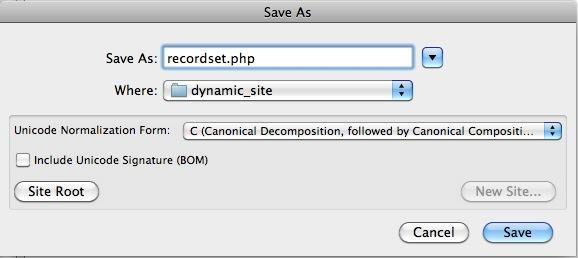
Go to File -> Save.
In the Save As option, enter "recordset.php"
In the Where section, select the folder for your site.
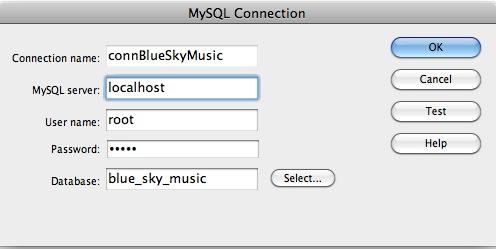
1) open the database panel by going to Window -> Database.
2) In the database panel, click the plus button and select MySQL Connection
3) enter host, username and password. When using a local testing server, the host name will be "localhost", the default user name will be "root". the password will depend on the package you use, by default with MAMP, the password is blank, but with XAMPP, the default password is "root"
4) click the select button next to database and select the blue_sky_musing database we created in the previous section.
5) Click the test button
6) Click save
A simple recordset to connect to the items table
Go to Window -> Server Behaviors to open the server behaviors panel
In the Server Behaviors panel, click the plus button and select Recordset
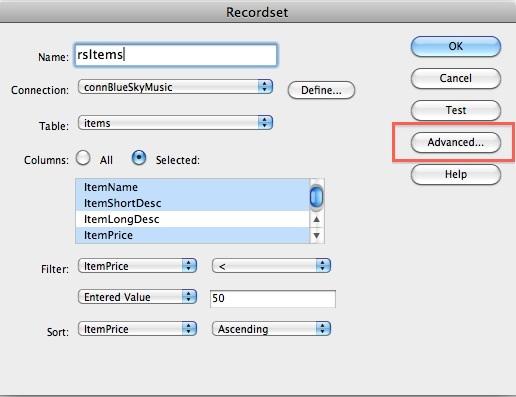
In this step we will create a simple recordset, if the recordset dialog is in advanced mode, click the Simple button to switch it to simple mode.
For the Name, enter rsItems.
From the Connections list, select the connBlueSkyMusic connection.
In the Columns section, change the All radio option to Selected. then using the Command button (Control on Windows) Select the itemName, itemShortDesc, itemPrice, and itemThumb columns
In the Filtering section, select:
'itemPrice' '<'
'Entered value' '50'
For the sort, select:
'itemPrice' 'ascending'
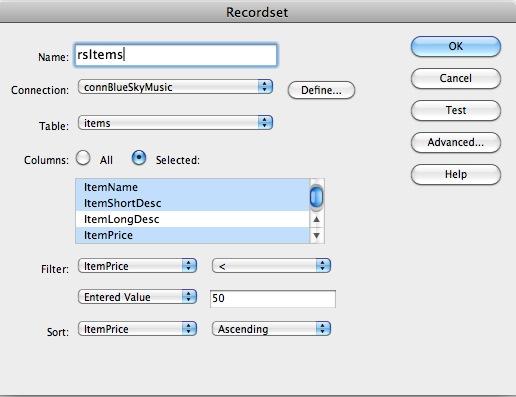
then click on the test button:
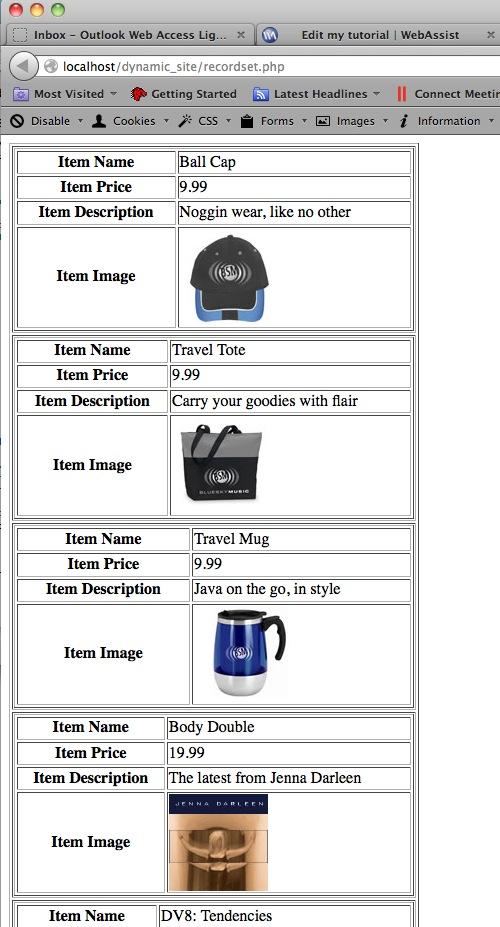
This will show the data from the recordset on your page.
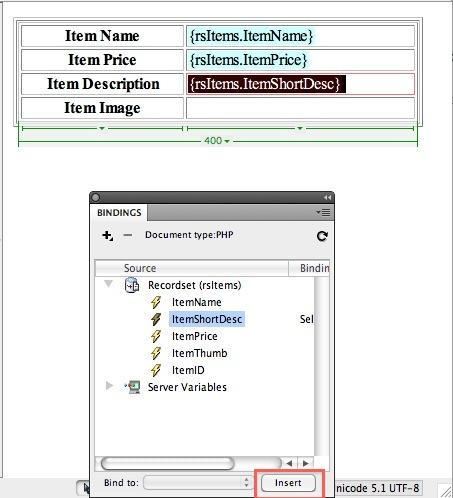
Add a table with 1 column ad 1 row.
go to Insert -> Table. in the table settings use 1 Column, 1 Row.
Place your cursor in the one cell then Go to insert -> Table.
for the table settings, use 4 Rows, 2 Columns, set the width to 400 Pixles. And select a left header:
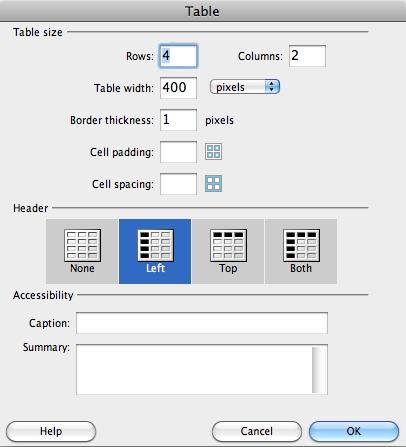
this will add a secondary table
In the left side column, enter labels:
Item Name, Item Price, Item Description, Item Image
in the column on the right, place your cursor, then open the bindings panel and expand the rsItemsRecordset, select the corresponding column and click the Insert button.
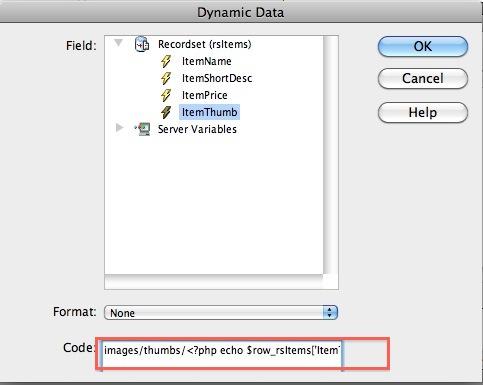
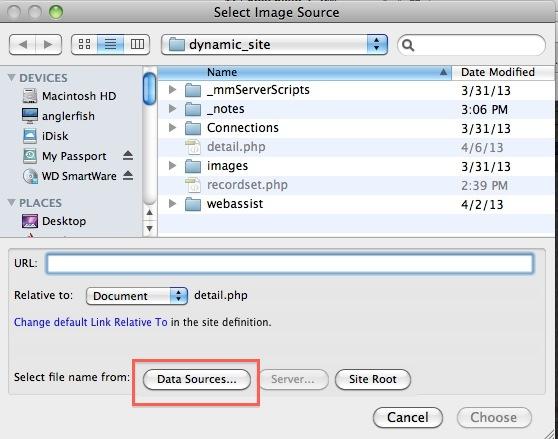
for the item image column, go to Insert -> Image. In the Image source Dialog Box, click the Data Sources button:
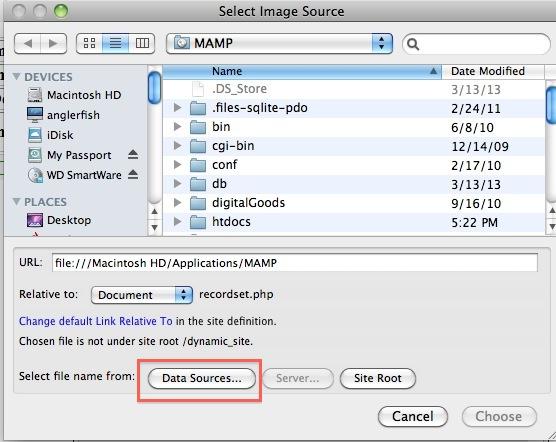
From the Dynamic data, selct the itemThumb column from the rsItems Recordset:
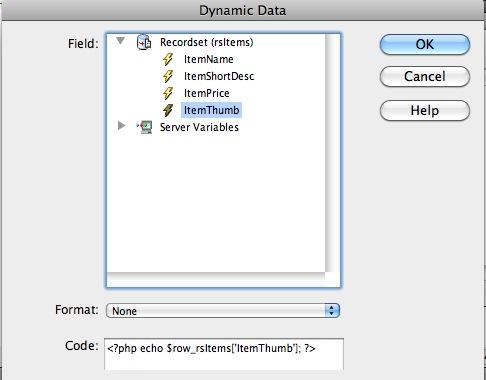
in the code section, add the images/thumbs/ path in front of the dynamic binding code:
In Split View, highlight the Item name Label:
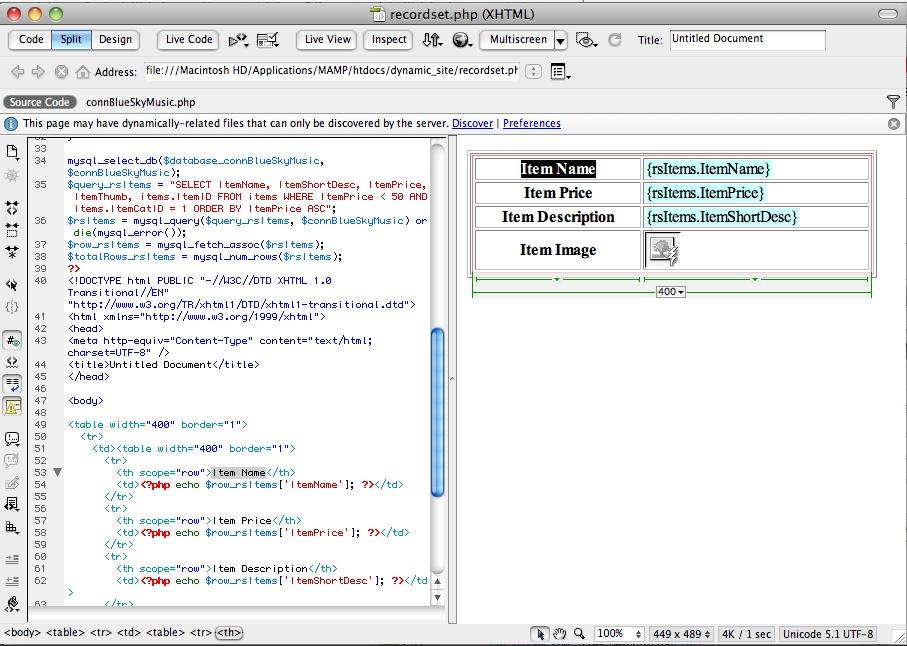
in the tag selector, select the main table <tr> tag:
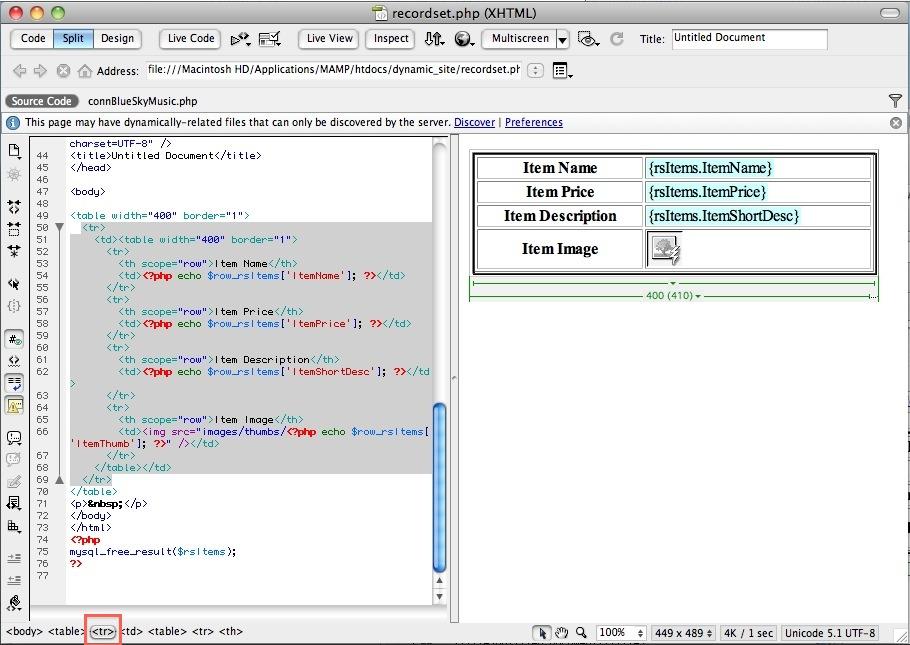
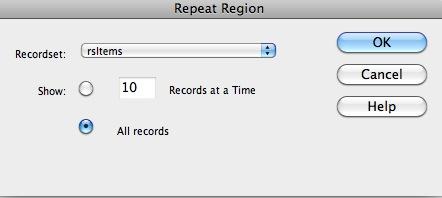
then add the repeat region behavior: in the server behaviors panel, click the plus button then select Repeat Region.
From the recordset select list, select the rsItems recordset. and select to show all records:
Go to File -> Save to save the page, then File -> Preview in browser to see the page live:
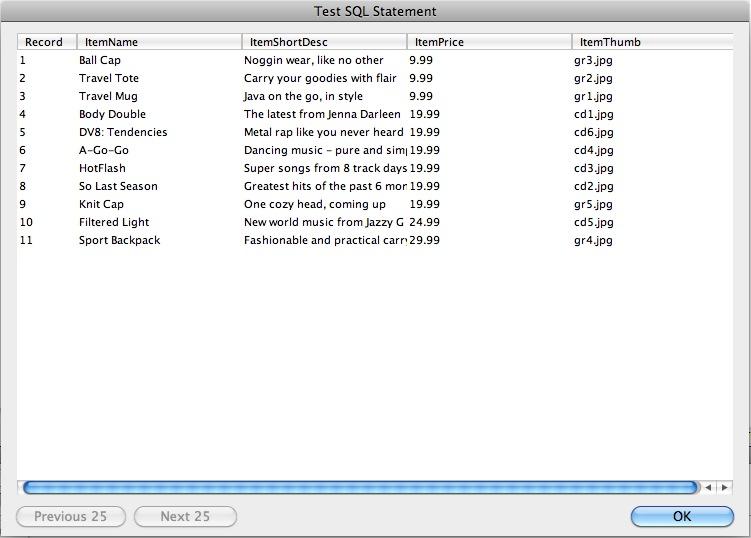
In the previous example, we created a simple recordset to return records where the itemPrice is less than 50.
using the advanced recordset dialog, you can add additional filters, and create more advanced SQL queries.
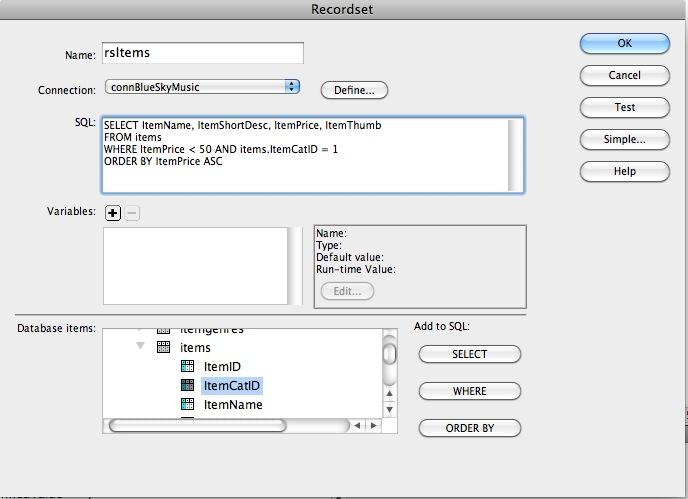
Lets add a condition so that we returnitems where the itemPrice is less 50, And the itemCategory is 1
open the server behaviors panel (Window -> Server Behaviors) and double click the rsItems recordset in the list.
in the recordset dialog, click the advanced button:
the advanced recordset looks like this:
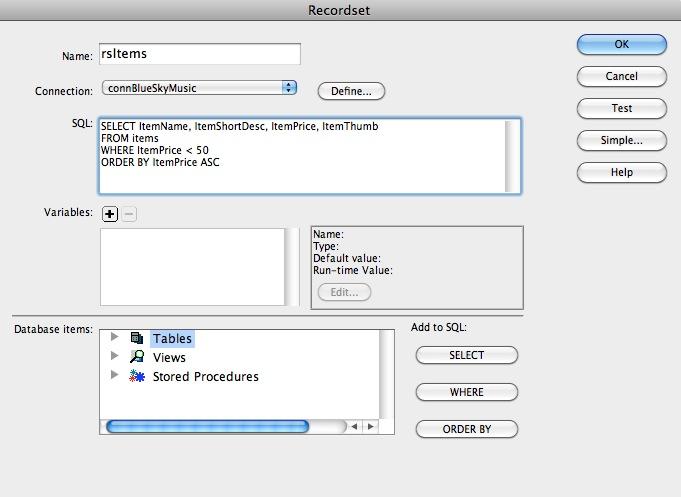
initially, the where clause of the recordset is:
WHERE ItemPrice < 50
to add an aditional filter, we need to add to the where clause.
In the Database Items section, Expand tables
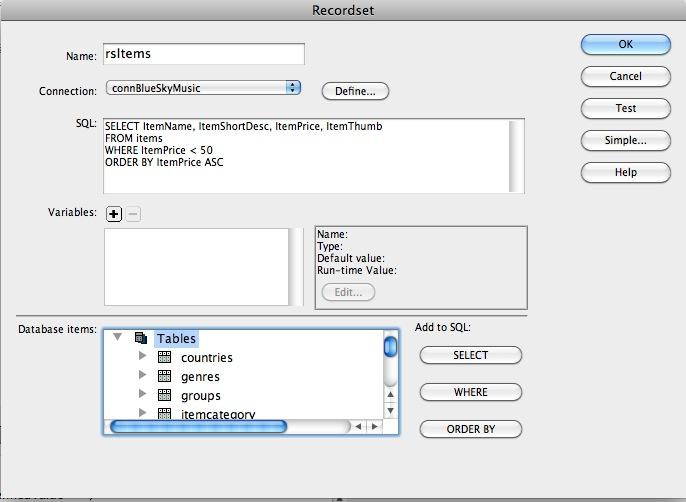
Expand the Items Table. Select the itemCatID column and click on the WHERE button:
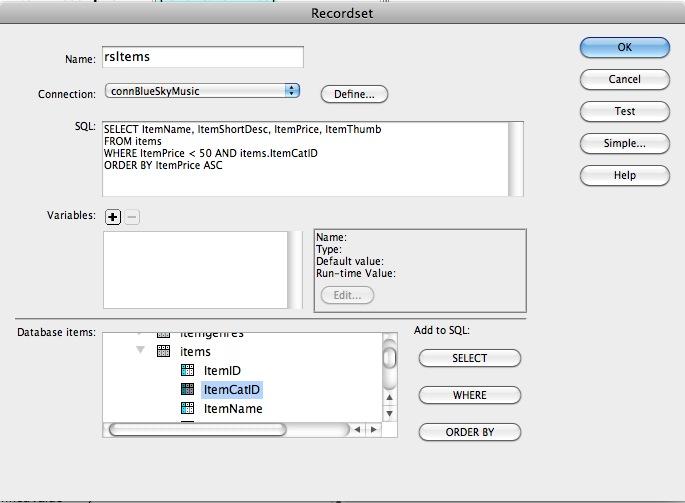
the where cluase now is:
WHERE ItemPrice < 50 AND items.ItemCatID
we need to add the condition by changing it to:
WHERE ItemPrice < 50 AND items.ItemCatID = 1
On testing the recordset, it returns the following results:
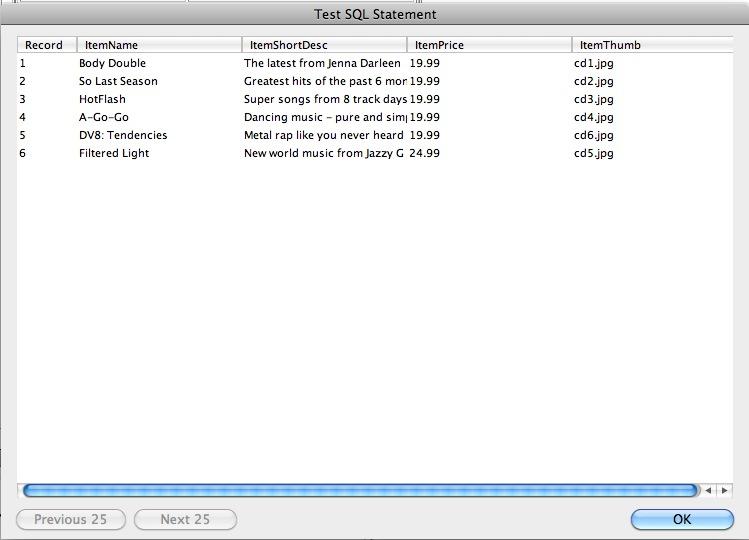
Unlike the simple recordset, this now only returns 6 results since it is only returning records for category 1.
Preview the recordset page in the browser again, and it will show the category1 items only:

In this section, we will add a link to the master listing page that will allow us to return a single record using a look up recordset.
This is similar to creating the first recordset.php file in our site.
Go to File -> New to open the new file wizard. from the file types list select PHP and click the create button.
Go to File -> Save as to save the file to the site and name it details.php
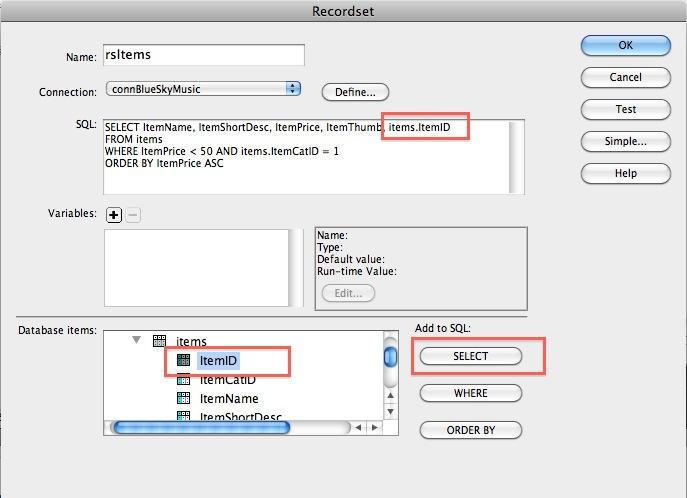
On the recordset.php page, we need to edit the recordset to return the ItemID column.
in the server behaviors list, double click the recordset to edit it. It should still be in advanced view.
In the database items section, expandd table, expand the Items table and select the ItemID column and click the select button, this will add the ItemID column to the select statement:
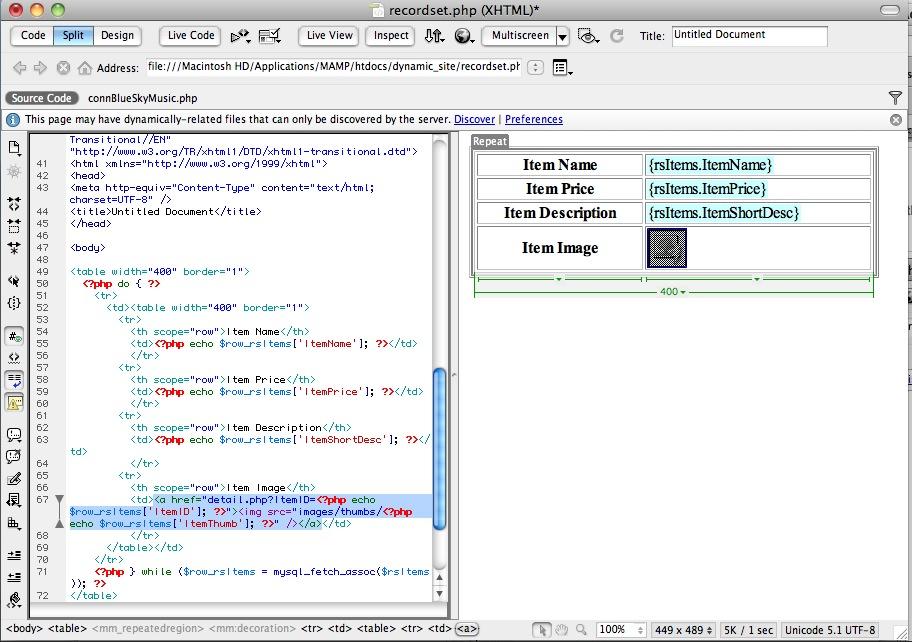
On the recordset.php page, select the image place holder in design view. In the property inspector, Click the folder Icon next to link
in the file browser, selct the details page, then click the parameters button
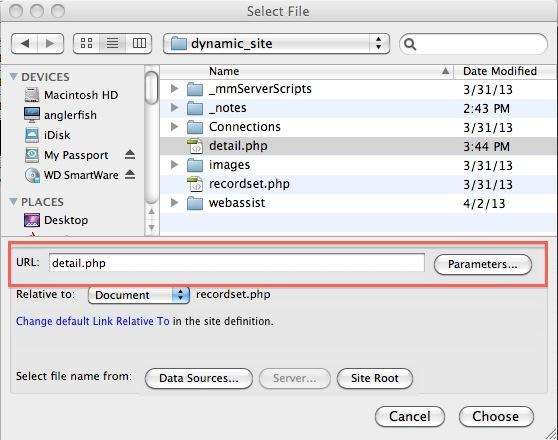
Set the Name to "ItemID" and click the lightning bolt next to value, from the dynamic bindings window, select the ID column from the rsItems recordset.
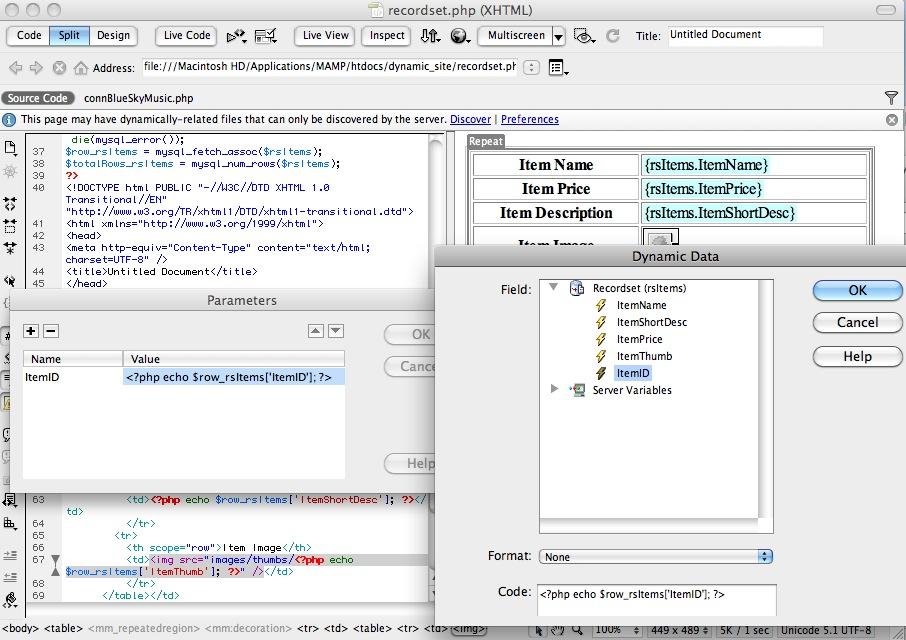
click ok in the binding window, ok again in the parametes window, then chose in the file browser window to get back to the page and have the link applied to the image.
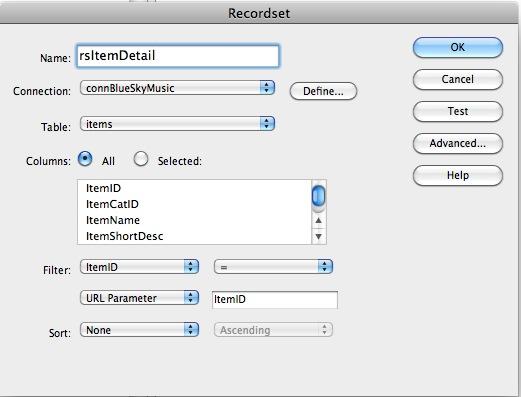
open the detail.php page and go tothe server behaviors panel, click the plus button and Recordset.
We can use Simple view for this recordset
Name the recordset rsItemDetail
From the tables list, select the Items Table.
In the Filter section, set the filtering to use the ItemID column, A URL variable and name the URL variable ItemID to match the name used in the link
Similar to recordset page, we will add a table to show the details
Go to Insert - > Table, set the Columns to 2, and Rows to 4. Set the width to 400, and use the left column as the header

In the left side, add the labels for the columns you will use, on the right side, use the bindings panel, ssplace your cursor in a cell, select the column to display and use the Insert button to add the binding to the page
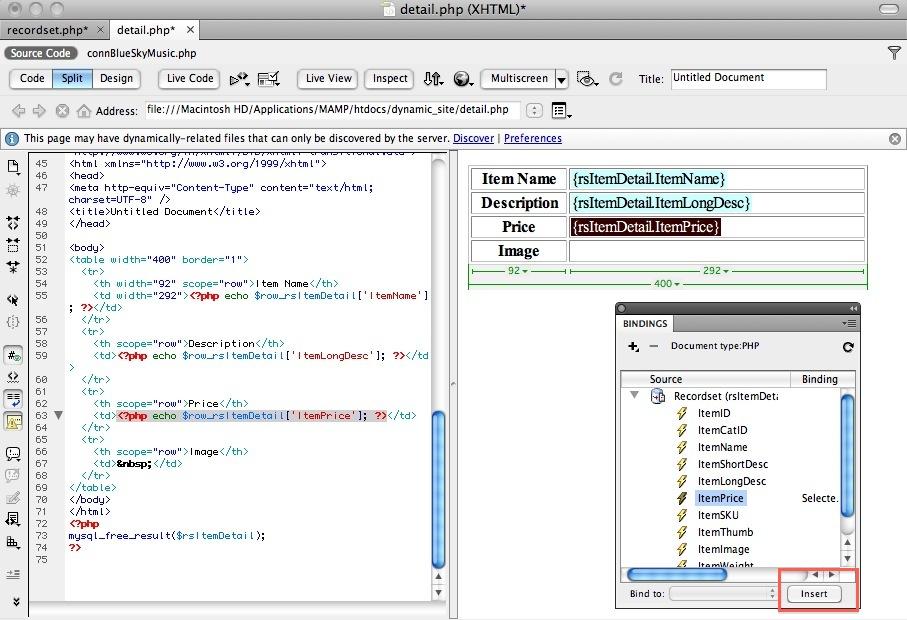
Place your Cursor In the item Image cell, Go to Insert -> Image. In the oimage source window, click the data sources button:
From the bindings, expand the rsItemDetail recordset and select the ItemImage column
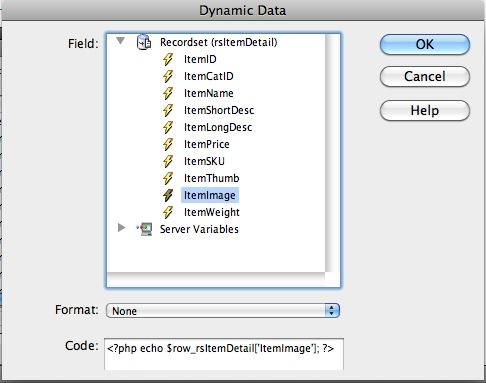
Click OK to apply the image.
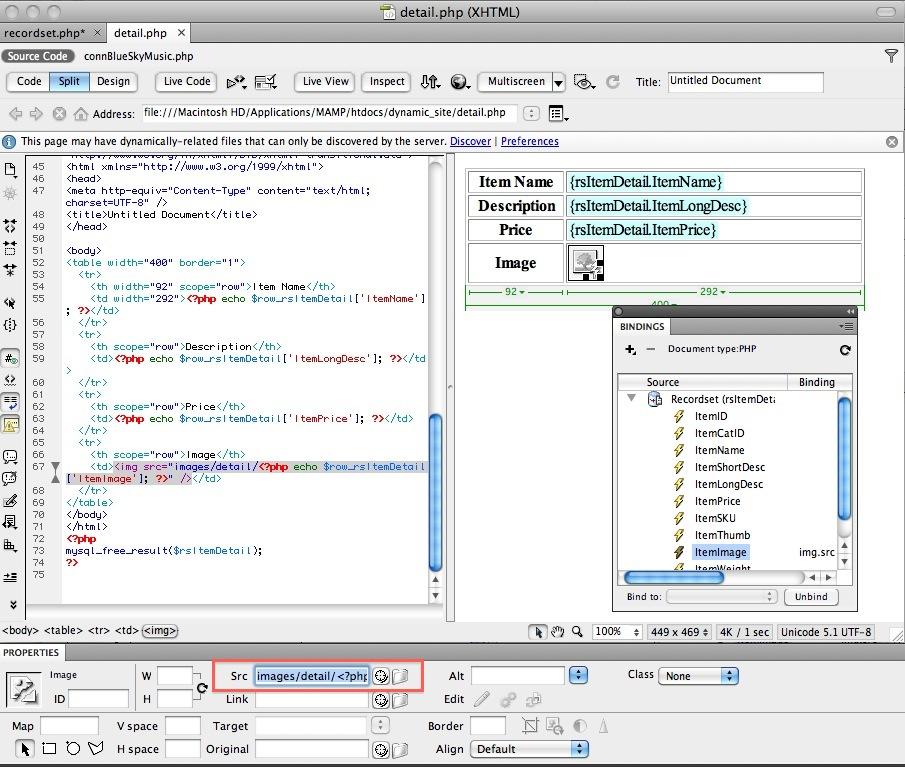
In the Property inspector, add the image path in front of the dynamic binding code in the image source
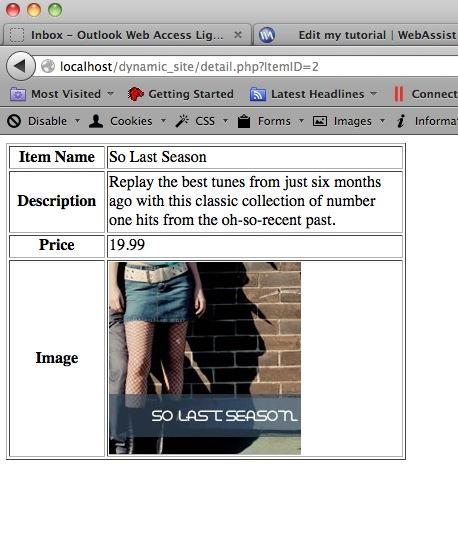
save both pages, and preview the recordset page in the browser. the images should be a click-able link that brings you to the detail page
We have a free eCommerce database available here that you can experiment with.
Also, here are a couple other .sql scripts for a sample event registration, physical goods, and digital goods databases:
mysql_dbs.zip
Comments will be sent to the author of this tutorial and may not be answered immediately. For general help from WebAssist, please visit technical support.
Sign in to add commentsYour friends over here at WebAssist! These Dreamweaver extensions will assist you in building unlimited, custom websites.
These out-of-the-box solutions provide you proven, tested applications that can be up and running now. Build a store, a gallery, or a web-based email solution.
©1999-2026 WebAssist.com Corporation. All rights reserved and all that jazz.

Account or customer service questions?
Please user our contact form.
Need technical support?
Please visit support to ask a question
Lynn: 12 Years, 3 Months, 3 Weeks, 3 Days, 8 Hours, 51 Minutes ago
Excellent tutorial - gets right to the point of what we are all needing to get started. Thanks, LynnD
: 11 Years, 7 Months, 2 Weeks, 1 Day, 2 Hours, 45 Minutes ago
I am on a windows 7 laptop, and so do not have a "Data Sources" or "Parameters" button when asked in this tutorial to click on them. What is the workaround for windows users?