Creating your database connection in Dreamweaver is the final step in preparing your system for dynamic web development. Once this has been defined, you are ready to start producing dynamic websites. A PHP database connection tells Dreamweaver that the current site is going to create PHP pages and refer to a specific database to store or display data.
This tutorial shows you how to set up a PHP database connection from within Dreamweaver that you can then use for your site.
The Databases panel allows you to define database connections for your site. This even gives you the opportunity to preview some of the data in your database once a connection is established.

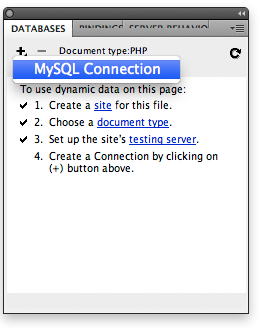
The Databases Panel should now be open.
Once the databases window is accessible, it's time to make a new connection.


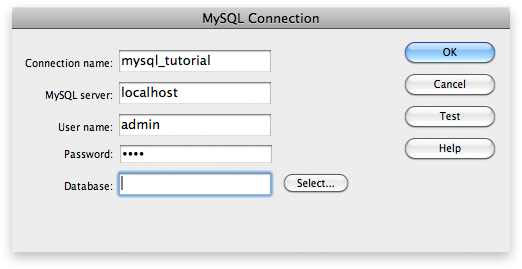
- You entered something wrong in the Connection fields. Check that you entered everything correctly.
- Most hosting providers won't let you connect to your live database externally. In this case, your connection will probably be correct, but you won't be able to test it. Simply upload your files to your live server for testing in a browser.
Dreamweaver creates a Connections folder in your current site. This folder will contain a file that includes the details for accessing your database. If you create additional database connections, a new file will be added to this same folder.
Confirm that this folder exists and contains the new connections file.
Now that your database connection is completely set up, you can now utilize it to create dynamic content for your site. Depending on what you intend to create, you might want to start using one of WebAssist's dynamic Dreamweaver extensions, such as DataAssist, eCart, or SecurityAssist.
With your database connection created, you are now ready to jump right into the Getting Started Guides for any of these products.
Comments will be sent to the author of this tutorial and may not be answered immediately. For general help from WebAssist, please visit technical support.
Sign in to add commentsYour friends over here at WebAssist! These Dreamweaver extensions will assist you in building unlimited, custom websites.
These out-of-the-box solutions provide you proven, tested applications that can be up and running now. Build a store, a gallery, or a web-based email solution.
Skyrunner428939: 12 Years, 9 Months, 1 Week, 5 Days, 1 Hour, 21 Minutes ago
Hello, I read carefully this tutorial and I found some problems in trying to connect mine msql database with dreamweaver. I recieve contanly an 404 error when trying to connect the database. After loosing hours on searching and trying to find out why this fault was appearing I finally found the reason of this error 404. The database could connect because there was a port failure in MAMP port configuration. When installing the MAMP server, the ports were standard set to default apache port:8888 and MYSQL port 8889 instead of to be set to 80 and to 3306. You must click to the button "set to default Apache and MySQL port" to change the standard port selection. From that moment everything was OK.
I think you should catch more specially the attention of the user in this important "changing port address" when installing the MAMP server in the specific tutorial.
shootersolutions: 12 Years, 4 Months, 4 Weeks, 2 Days, 22 Hours, 57 Minutes ago
The first thing you have to do after doing the stuff it says first, is to 1. create in the open panel a .php page, like with create a .php page in dreamweaver.
Then if you are using XAMP on Windows without a password, like me, then you need to do the following:
2. Click on the "+" to get to the MySQL to click on, then localhost is the server, I used "root" for the user, nothing entered for password, and the manually insert the database name - in my case ecommerce for the wa_ecommerce database, (without a password it wouldn't look , and without a database, it wouldn't test)
3. Hit "test" then click on error message: don't panic on the noise, checkbox do not show this again.
4. As long as there is no typos in the manual entering of the database name for PHPMyAdmin for me anyway.
Brenda: 11 Years, 10 Months, 2 Weeks, 6 Days, 15 Hours, 47 Minutes ago
I have Dreamweaver CC, the database feature has been removed. What would you suggest to do to get around this and still create a database for the e-commerce site? I got stuck on the first page of instruction :(
Team WebAssist: 11 Years, 10 Months, 2 Weeks, 5 Days, 21 Hours, 13 Minutes ago
Follow this tutorial to install the Database Window into CC:
http://www.webassist.com/tutorials/Server-behaviors-for-Dreamweaver-Creative-Cloud
: 11 Years, 5 Months, 2 Weeks, 5 Days, 2 Hours, 26 Minutes ago
This was very easy to follow. I would like to make a comment for those who are having some issues.
I kept getting an error, so I tried changing things around. After the problem persisted, I went to my hosting company and looked up the database that I created.
When I did this I found out that the database was not the actual url of the website but in a different url provided by the hosting comapny and was refering my site. So, if you are having problems connecting during the test, go to your hosting company and ask where your actual database address is. This is going to solve that issue right away.
Tazul: 3 Years, 4 Weeks, 2 Days, 11 Hours, 46 Minutes ago
I am unable to connect my database in Macromedia Dreamweaver MX 2004:
Displaying the bellow message:
HTTP Error Code 404 File Not Found. Here are some possible reasons for the problem:
1) There is no testing server running on the server machine.
2) The testing server specified for this site does not map to the http://localhost/library_Project/_mmServerScripts/MMHTTPDB.php URL. Verify that the URL Prefix maps to the root of the site.