In this tutorial, we're going to show you how to set up database-driven product pages with Data Bridge, then use Free Tools to add some PayPal buttons, allowing your customers a quick, trusted checkout. We'll also create some administrative pages you can use to insert products into (or edit products in) your database.
This is a beginner level tutorial, but it has lots of steps, so hold onto your hats, and let's get this party rolling!
- A dynamic site set up within Dreamweaver
- Dreamweaver CS4 or later
- Free Tools installed and activated in Dreamweaver
- Data Bridge installed and activated in Dreamweaver
- A blank database with a proper connection set up in Dreamweaver
- The Tutorial Product Presets, which can be downloaded here
tutorial_presets.zip
Well, here we are again at the first step in the tutorial. My personal favorite step, because it sets the tone for the rest of everything ever. in this step we're going to be importing our awesome presets into Data Bridge, so we need to open the Preset Manager. From there we can import the heck out of these presets, and we're onto the next step
- Open the tutorial_presets.zip you downloaded in the previous section of this tutorial
- Save the files inside of it somewhere easily accessible
- In Dreamweaver, click WebAssist > Preset Manager
- From the Product drop down, select Data Bridge - Preset
- Click the Import button
- Browse to the tutorial_admin_preset.zip preset file from the tutorial_presets.zip
- Click Open
- Repeat the steps for the tutorial_catalog_preset.zip preset
Good. Great. Awesome. You imported the files. I'm impressed.
This step is going to have us creating Product Administration pages through Data Bridge using our newly imported funky fresh presets. Let's do that now, shall we.
- Create a blank PHP page in the root of your site
- Open the blank PHP page
This is to make sure DataAssist creates the pages in the correct directory level
- Click WebAssist > Database > DataAssist Pages
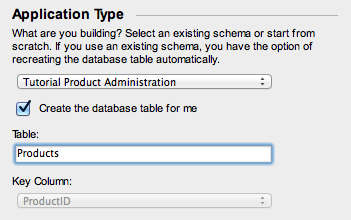
- Change the Application Type to Tutorial Product Administration
- Make sure the Create the database table for me is checked
This is going to let Data Bridge create the correct database setup for this specific tutorial. It'll be awesome
- Change the connection to the one pointing to your blank database
- Edit the Page Design to exactly how you wish it to be
For this tutorial, this step isn't needed, so we're keeping the Page Design as Basic, but edit away
- Click the Manage Pages tab
- Ensure the pages are named using the following naming conventions:
- Search > admin/admin_search.php
- Results > admin/admin_results.php
- Detail > admin/admin_detail.php
- Insert > admin/admin_insert.php
- Update > admin/admin_update.php
- This is done by following these steps:
- Click on the pages under the Define Features section
- Change the names under the Page Name & Location field
- Click Finish
- Uncheck the Save as preset checkbox
- Click OK
After Data Bridge works its voodoo and makes your pages, we're ready to move on to the next step! At this point you can test your pages to make sure they work right, and maybe add a few test items that you'll be selling in your fake store.
Now we're going to be creating the Product Catalog pages. These will be the pages the store patrons will see, if this was going to be a real store. If it IS going to be a real store, then there you go.
- Return to the blank PHP page that we created in the root of your site
This is to make sure DataAssist creates the pages in the correct directory level
- Click WebAssist > Database > DataAssist Pages
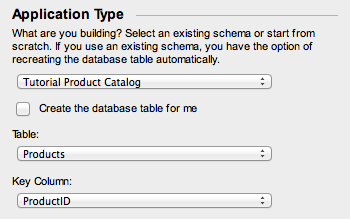
- Change the Application Type to Tutorial Product Catalog
- Make sure the Create the database table for me is unchecked
- Edit the Page Design to exactly how you wish it to be
For this tutorial, this step isn't needed, so we're keeping the Page Design as Basic, but edit away
- Click the Manage Pages tab
- Ensure the pages are named using the following naming conventions:
- Search > products_search.php
- Results > products_results.php
- Detail > products_detail.php
- This is done by following these steps:
- Click on the pages under the Define Features section
- Change the names under the Page Name & Location field
- Click Finish
- Uncheck the Save as preset checkbox
- Click OK
Once more into the breach of making pages within Data Bridge, dear friends, once more. As soon as these pages are made, you can view the product pages for the products you may have added from the first step, and see how the pages will look to your customers. These are the pages we're going to be adding our PayPal buttons to, once we get to that step far in the future. Next up: Adding PayPal buttons to your Product Catalog pages.
This is the end. This is it. No turning back now. You're all clear kid, so let's blow this thing and go home.
The last step of this magical journey is adding the PayPal Add to Cart buttons onto the pages with Add to Cart buttons in lieu of the existing ones. This is done with Free Tools, and is totally awesome possum.
Step 1: For products_detail.php
- Open the products_detail.php page
Now we need to make sure all the database columns are being pulled from the database so we have access to all of our information for the products.
- If the Bindings panel isn't visible, click Window > Bindings
- Look for the binding called Recordset (WADAproducts)
- Double click the binding to open it
- If you're in Advanced view, click the Simple%u2026 button to switch to simple mode
- Select the All radio button under Columns
- Click OK
Now we're going to run the following process. this will change the current page's form information and add the button
- Switch to Split view
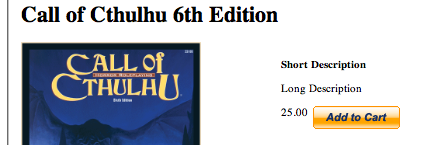
- Click on the Add to Cart button in Design view
- Click WebAssist > PayPal Standard > Add to Cart Button
- Now we're going to configure our button based on the product details for the selected product
- Enter your PayPal email address
- Click Next
For this tutorial, we're using a basic PayPal button, but you can use a custom button if you really want to
- Select a button you wish to use
- Click Next
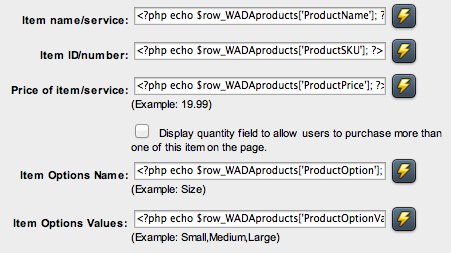
- Click the dynamic data lightning bolt for the Item name/service field
- Expand the Recordset (WADAProducts) recordset
- Select the ProductName binding
- Click OK
- Click the dynamic data lightning bolt for the Item ID/number field
- Expand the Recordset (WADAProducts) recordset
- Select the ProductID binding
- Click OK
- Click the dynamic data lightning bolt for the Price of item/service field
- Expand the Recordset (WADAProducts) recordset
- Select the ProductPrice binding
- Click OK
- Click the dynamic data lightning bolt for the Item Options Name field
- Expand the Recordset (WADAProducts) recordset
- Select the ProductOption binding
- Click OK
- Click the dynamic data lightning bolt for the Item Options Values field
- Expand the Recordset (WADAProducts) recordset
- Select the ProductOptionValues binding
- Click OK
- Click Next
- Fill in any needed fields
In this tutorial we're leaving them all blank
- Click Next
- Enter your Success URL
- Enter your Cancel URL
- Click Finish
- SAVE ALL THE THINGS!
Step 2: For products_results.php
- Open the products_results.php page
Now we need to make sure all the database columns are being pulled from the database so we have access to all of our information for the products.
- If the Bindings panel isn't visible, click Window > Bindings
- Look for the binding called Recordset (WADAproducts)
- Double click the binding to open it
- If you're in Advanced view, click the Simple button to switch to simple mode
- Select the All radio button under Columns
- Click OK
Just like before, we're going to run the following process. this will change the current page's form information and add the button
- Switch to Split view
- Click on the Add to Cart button in Design view
- Click WebAssist > PayPal Standard > Add to Cart Button
Now we're going to configure our button based on the product details for the selected product
- Enter your PayPal email address
- Click Next
For this tutorial, we're using a basic PayPal button, but you can use a custom button if you really want to
- Select a button you wish to use
- Click Next
- Click the dynamic data lightning bolt for the Item name/service field
- Expand the Recordset (WADAProducts) recordset
- Select the ProductName binding
- Click OK
- Click the dynamic data lightning bolt for the Item ID/number field
- Expand the Recordset (WADAProducts) recordset
- Select the ProductID binding
- Click OK
- Click the dynamic data lightning bolt for the Price of item/service field
- Expand the Recordset (WADAProducts) recordset
- Select the ProductPrice binding
- Click OK
- Click the dynamic data lightning bolt for the Item Options Name field
- Expand the Recordset (WADAProducts) recordset
- Select the ProductOption binding
- Click OK
- Click the dynamic data lightning bolt for the Item Options Values field
- Expand the Recordset (WADAProducts) recordset
- Select the ProductOptionValues binding
- Click OK
- Click Next
- Fill in any needed fields
In this tutorial we're leaving them all blank
- Click Next
- Enter your Success URL
- Enter your Cancel URL
- Click Finish
- SAVE ALL THE THINGS!
Aaaaaaaaaaaaaaaand done! You've completed it all, and done an amazing job. You should go test your pages and make sure everything works as expected.
You are a genius and have impressed even me. The next step would be to make it more advanced. Maybe add a highly customized button, or add some shipping and handling chargers. Maybe create a whole product catalog and actually start selling.
Whatever you choose to do next, you have the important fundamentals you need to create a nice, simple shopping cart that uses PayPal buttons that pull their info from a Data Bridge database.


: 12 Years, 1 Week, 2 Days, 16 Hours, 23 Minutes ago
Thanks for this Tutorial. it helps me alot...
: 11 Years, 11 Months, 2 Weeks, 2 Days, 10 Hours, 20 Minutes ago
I get to the step where I create a new PHP page then I go to WebAssist>Database>DataAssist Pages and it says "Please save the current document before using this interface". So I save it as "WebAssistTut" in the root of my webpage and then go back to WebAssist>Database>DataAssist Pages and I get "No database connection found. You must create a database connection in order to continue."
Team WebAssist: 11 Years, 11 Months, 2 Weeks, 2 Days, 10 Hours, 4 Minutes ago
Make sure you do everything you need to do in the "What you need to start" section at the beginning of this tutorial, including a database connection. If you don't know how to set up a database connection in Dreamweaver, you can use this tutorial:
http://www.webassist.com/tutorials/Create-a-PHP-database-connection