close ad
 
Important WebAssist Announcement
open ad
View Menu

Web development tutorial

Applying Register/Login to your Checkout Process

Tutorial created by Ray Borduin, WebAssist

Categories: eCart, PowerStore, Dreamweaver, MySQL, PHP

rating

It’s very common for an online store to require a user be logged in before making a purchase. Here are a few benefits to implementing this on your site.

-Tracking repeat customers
-Provide member/upgrade discounts
-Create Order History and Download Center pages

arrow downBefore you begin

This tutorial begins with eCart and SecurityAssist functionality already implemented. For information on creating the eCart checkout functionality, or the SecurityAssist user registration and login functionality, please see the following tutorials:

  1. eCart Getting Started Guide
  2. SecurityAssist Getting Started Guide

arrow downRequirements

You will need to have the following items ready to go before starting this tutorial:

  1. Dreamweaver CS3 or later
  2. Dreamweaver site with eCart checkout functionality already created.
  3. SecurityAssist 2
    Register, log in and log out functionality already created
  4. WebAssist Free eCommerce MySQL database (Optional) wa_ecommerce_db.zip
This tutorial refers to the Free eCommerce MySQL database that is provided by WebAssist. This database contains all the necessary tables and columns to complete this tutorial. If you are not using this database, you will need to review the table and column references to make sure they match up with your database structure.

arrow downCreate the Download Center

The first step in applying security to your checkout pages is to create a URL variable that we will use for when the redirect to the Login page occurs.
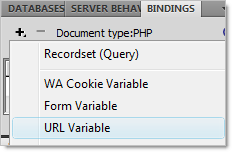
  1. Open your Login page in Dreamweaver.
  2. From the Bindings panel, choose Add ( ) > URL variable.

  3. In the URL Variable Name field, enter checkout.
  4. Click OK.


This will allow us to specify content to display on the Login page, only when arriving from one of the checkout pages. This is a very common practice, to alert your customers to why they are being asked to login.

arrow downAdd Access Pages Rule

Next, using the SecurityAssist Access Pages Manager, we will specify the rule that redirects users who are not logged in to the Login page.

  1. From the WebAssist menu, choose Security > Manage Site Access > Access Pages Manager.
  2. In the Access Pages Manager, select all the pages related to the checkout process.
    You want to select all pages (except the cart page) to prevent visitors from accessing those pages without having logged in.
    Hold down Ctrl on your keyboard to select multiple pages at a time.

  3. From the Grant access if menu, choose Logged in to users.
    'users' may be different depending on your database configuration.
  4. Choose the If access denied, go to field browse icon.
  5. Choose the Login page.
  6. Click OK.
  7. Place your cursor at the end of the path to your Login page.
  8. Type ?checkout=1.

  9. Click OK to apply these changes.
With this setting applied to your checkout pages, if a visitor is not logged in and attempts to access one of these pages, they will be redirected to the Login page while including the URL variable we created in the URL.

arrow downCreate the Access rule

Now that we%u2019ve created the redirect to the login page, we need to create the access rule that will be used for visitors who access this page from the checkout page.
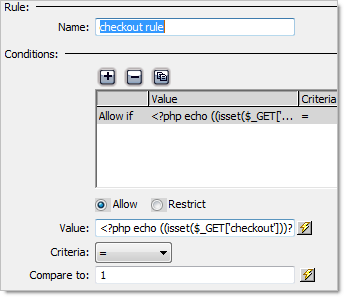
  1. From the Modify menu, choose Security > Access Rules Manager.
  2. Click the Add icon.
  3. In the name field enter checkout rule.
  4. Click the Conditions Add icon.
  5. Select the Value field lightning bolt.
  6. Expand the URL option and select the checkout URL variable.
    This refers to the URL variable we created earlier.
  7. Click OK.
  8. From the Criteria menu, choose =.
  9. Enter 1 in the Compare to field.

  10. Click OK.


This rule will activate whenever the Login page is accessed via the redirect (/users_Login.php?checkout=1) we created earlier.

arrow downApply conditional text

This final step will allow you to specify some conditional text to appear on the Login page when a visitor has arrived there via the checkout page.

  1. Open the Login page in Dreamweaver.
  2. Place your cursor on your page where you wish this conditional text to appear.
  3. Enter the text you wish to appear.
    For example, 'Before proceeding, please log in.'
  4. Highlight the text you just entered.
  5. From the WebAssist menu, choose SecurityAssist > Show Region.
  6. From the Rule menu choose, checkout rule.

  7. Click OK.
You could also use this to display different content when the Login page is not accessed from the checkout page. In this case, you would choose not checkout rule from the Rule menu.


You have now applied a login redirect to your checkout pages allowing you to ensure that users are logged in before making purchases on your site.

arrow downWhat to do next...

There are a number of features you can add to your cart, now that you are requiring them to register or log in before checking out. For example, you could automatically populate certain fields of the checkout page, based on their user information. Or, you could create an Order History page to allow your customers to see what purchases they have made. You could even create a Download Center page that allows you to provide digital files to be downloaded.

  1. Automatically populate form fields on checkout tutorial
  2. How to Create an Order History
  3. How to Create a Download Center for selling digital goods

arrow downReviews and comments

Comments will be sent to the author of this tutorial and may not be answered immediately. For general help from WebAssist, please visit technical support.

Sign in to add comments
rating

Build websites with a little help from your friends

Your friends over here at WebAssist! These Dreamweaver extensions will assist you in building unlimited, custom websites.

Build websites from already-built web applications

These out-of-the-box solutions provide you proven, tested applications that can be up and running now.  Build a store, a gallery, or a web-based email solution.

Want your website pre-built and hosted?

Close Windowclose

Rate your experience or provide feedback on this page

Account or customer service questions?
Please user our contact form.

Need technical support?
Please visit support to ask a question

Content

rating

Layout

rating

Ease of use

rating

security code refresh image

We do not respond to comments submitted from this page directly, but we do read and analyze any feedback and will use it to help make your experience better in the future.